Physical Address
304 North Cardinal St.
Dorchester Center, MA 02124
Physical Address
304 North Cardinal St.
Dorchester Center, MA 02124

Imagine creating a system that quietly works behind the scenes, catching market movements while you go about your day.
Are you ready to take the plunge into the exciting world of automated trading? Imagine creating a system that quietly works behind the scenes, catching market movements while you go about your day. Today, we’ll dive into building a script that trades for you—catching price breakouts in the early hours, then managing your risk with stop-losses, and closing your trades by the end of the trading day.
We’ll go step by step through how to write a range breakout strategy in MetaTrader 5 (MT5) using MQL5. The strategy involves placing buy stop and sell stop orders early in the day and letting the market decide which direction it wants to break out. The safety net? A stop-loss to limit potential losses if the market turns against you.
But first, let’s set up your environment.
Before we jump into the code, let’s make sure you’ve got all the tools in place. IC Markets is a popular broker offering MetaTrader 5 with tight spreads, making it ideal for automated trading. Here’s how to get everything up and running:
Great, now that MetaTrader 5 is ready, let’s get into the coding!
Before we start coding, let’s briefly explain what this range breakout strategy is all about.
This strategy places buy stop and sell stop orders early in the trading day, hoping that as the price moves during the day, it will break out in one direction (either up or down). Here’s how it works:
To visualize this strategy, here’s a simple diagram:
Imagine this chart represents a trading day:
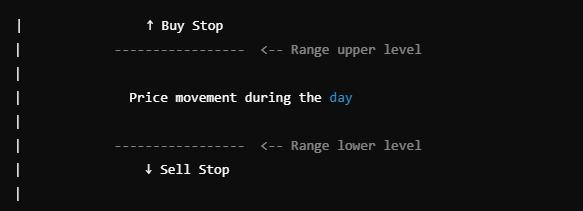
At the beginning of the day, the price is moving within a range (between the two dashed lines). You set a buy stop just above the range and a sell stop just below it. The price can break out in either direction during the day. When it does, the relevant order (buy or sell) is triggered, and with the help of a stop-loss, your risk is managed.
Now, let’s start coding!
Open MetaEditor (included with MetaTrader) and create a new Expert Advisor (EA). Name it ConfigurableRangeBreakout.mq5.
Below is the step-by-step guide to writing the EA code. Follow along carefully, and by the end, you’ll have a functional strategy catching breakouts!
The first step is to include some basic details and a few settings for our Expert Advisor.
cppCopy code//+------------------------------------------------------------------+
//|                                    ConfigurableRangeBreakout.mq5 |
//|                                                                  |
//|                                                                  |
//+------------------------------------------------------------------+
#property copyright "Your Name"
#property link      "http://www.yourwebsite.com"
#property version   "1.11"
#property strict

#include <Trade\Trade.mqh>
This section defines the EA name and loads the necessary trading library so we can place orders.
Next, we define some parameters that will control how our EA behaves. These parameters allow us to configure when to place the orders, the size of the orders, and the stop-loss.
cppCopy code// Input parameters
input int BuyFromHour = 1;     // Start hour to set buy/sell stops (0-23)
input int BuyFromMinute = 0;   // Start minute to set buy/sell stops (0-59)
input int BuyToHour = 5;       // End hour to set buy/sell stops (0-23)
input int BuyToMinute = 0;     // End minute to set buy/sell stops (0-59)
input int SellHour = 13;       // Hour to close all positions (0-23)
input int SellMinute = 0;      // Minute to close all positions (0-59)
input double RangePercent = 0.5; // Range size as percentage of current price
input double LotSize = 0.01;   // Fixed lot size for orders
input int StopLossType = 0;    // 0 for percentage-based, 1 for pip-based
input double StopLossValue = 1.0; // Stop Loss value (percentage or pips)
These inputs allow you to control the exact time when buy and sell stops are placed, and they also allow you to adjust the lot size and stop-loss settings.
Next, we initialize the EA and set up a timer to ensure the program checks the market regularly.
cppCopy codeint OnInit()
{
   Print("EA initialized. BuyFrom: ", BuyFromHour, ":", BuyFromMinute,
         ", BuyTo: ", BuyToHour, ":", BuyToMinute,
         ", Sell: ", SellHour, ":", SellMinute);

   // Set up a timer to check every minute
   EventSetTimer(60);

   return(INIT_SUCCEEDED);
}

void OnDeinit(const int reason)
{
   EventKillTimer();
}
This code runs when the EA is first loaded onto a chart, printing out the key parameters and setting a timer to check every minute.
The OnTick function is triggered every time the price changes. It will decide whether it’s time to place a new buy or sell stop order.
cppCopy codevoid OnTick()
{
   datetime currentTime = TimeCurrent();
   MqlDateTime str_time;
   TimeToStruct(currentTime, str_time);

   // Check if it's time to set new levels
   if((str_time.hour > BuyFromHour || (str_time.hour == BuyFromHour && str_time.min >= BuyFromMinute)) &&
      (str_time.hour < BuyToHour || (str_time.hour == BuyToHour && str_time.min <= BuyToMinute)) &&
      !g_LevelsSet)
   {
      SetNewLevels();
   }

   CheckCloseConditions();
}
Here, we determine the correct time for placing buy and sell stop orders and ensure everything runs smoothly by checking every minute.
Now we move on to the function that actually places the buy and sell stop orders at the right levels:
cppCopy codevoid SetNewLevels()
{
   double currentPrice = SymbolInfoDouble(_Symbol, SYMBOL_BID);
   double range = currentPrice * RangePercent / 100;
   double stopLoss;

   if(StopLossType == 0) // Percentage-based
   {
      stopLoss = currentPrice * StopLossValue / 100;
   }
   else // Pip-based
   {
      stopLoss = StopLossValue * SymbolInfoDouble(_Symbol, SYMBOL_POINT);
   }

   g_BuyStopPrice = NormalizeDouble(currentPrice + range, _Digits);
   g_SellStopPrice = NormalizeDouble(currentPrice - range, _Digits);

   double buyStopLoss = NormalizeDouble(g_BuyStopPrice - stopLoss, _Digits);
   double sellStopLoss = NormalizeDouble(g_SellStopPrice + stopLoss, _Digits);

   // Place buy stop order
   if(trade.BuyStop(LotSize, g_BuyStopPrice, _Symbol, buyStopLoss))
   {
      g_BuyStopTicket = trade.ResultOrder();
      Print("Buy Stop order placed: ", g_BuyStopTicket);
   }

   // Place sell stop order
   if(trade.SellStop(LotSize, g_SellStopPrice, _Symbol, sellStopLoss))
   {
      g_SellStopTicket = trade.ResultOrder();
      Print("Sell Stop order placed: ", g_SellStopTicket);
   }

   g_LevelsSet = true;
   g_LastActionTime = TimeCurrent();
}
This is where the magic happens. We calculate the stop-losses, place the orders, and record them for later management.
To complete the strategy, we need to close all positions by a specific time. Here’s how we manage that:
cppCopy codevoid CheckCloseConditions()
{
   datetime currentTime = TimeCurrent();
   MqlDateTime str_time;
   TimeToStruct(currentTime, str_time);

   datetime sellTime = StringToTime(StringFormat("%04d.%02d.%02d %02d:%02d:00",
                                    str_time.year, str_time.mon, str_time.day,
                                    SellHour, SellMinute));

   if(currentTime >= sellTime)
   {
      CloseAllPositions();
   }
}
This function monitors the time and ensures that all open positions are closed at the specified time, no matter what the outcome of the trades has been.
Congratulations! You’ve just built a range breakout strategy from scratch. This strategy automatically sets buy and sell stop orders early in the day, manages risk with a stop-loss, and closes positions by the end of the trading session.
Here is the performance over 2 years. However let me disclaim right here that you might not be able to repeat the same performance, due to other commission structure, software and trading platforms you might have.

Automated trading can feel like having a team of tireless robots working for you around the clock. Test this strategy on a demo account, and tweak the parameters to suit your trading style.
Rene Balke came up with the idea of this breakout strategy, to buy at a specified time, sell at a later time with no other indicators than just a stoploss to protect capital.